
I found the car. Needs some suspension work and shocks...brakes, brake pads, lining, steering box, transmission, rear end -- Ecto-1!
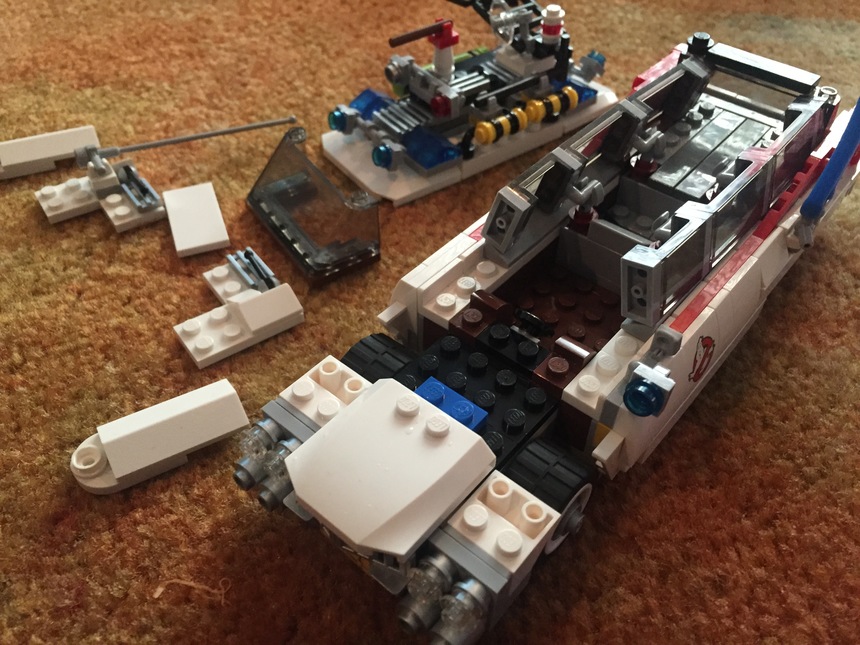
So we've had the original Ecto-1 for quite some time now (I'd actually gotten it for my son right after it came out) and it was one of the first more complex Lego models that he put together by himself (he was only 5 at the time). As we await Christmas, my son and I decided to take a Saturday afternoon and light up our other Ghostbuster kit.
You break down the top portion of the car along with the hood to start:


From there, you can work on the four lights for the headlight assembly, running those wires back over the wheel wells and into the main cabin of the car:


Before you re-assemble the lining on the driver's side of the car, run the light used on the driver's side mirror as well (make note here that the light has to be inserted with the light portion facing down as it won't fit otherwise):


Then it's on to the rear bumper so you can get the tail lights set up:


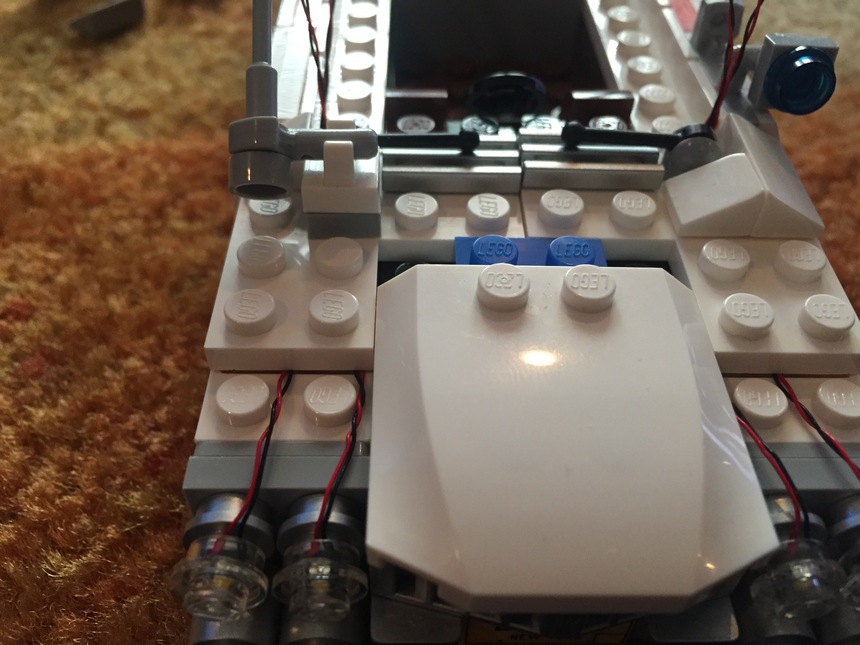
Then, you twist up all the wires for the bottom and get them plugged into the 1x4 expansion boards; the guide calls for 1x9 boards to be used, but I really felt that the 1x4 boards work out better as they can be arranged a little bit easier in the cab of the car. Just make sure you keep a couple of extra 1.5" connector wires handy so that you have enough to tie everything together:


This is usually a good point to plug in your power source real quick and give it a test to make sure you don't have any shorts. Now, when it comes to the roof, this is the more time-consuming portion. Honestly, I did the front and back portions of the roof first, and then rebuilt the entire middle section of the roof, inserting the lights I wanted along to the way. There is just SO much that you can light up on the roof, that there is a LOT of flexibility on how you put it all together. You may want to have a few spare flashing white and/or red lights lying around to do this section. And, just make sure that whatever you add, you have enough ports to plug everything in and are able to carry all the wiring underneath the roof as you go:


Once you've gotten everything in the middle section finished up, twist all the wires together after you've gotten them secured down:

At this point, the care is ready to be reassembled and the power source put in as well. Just re-arrange everything in the cab so that you have room for the power source near the rear of the car:


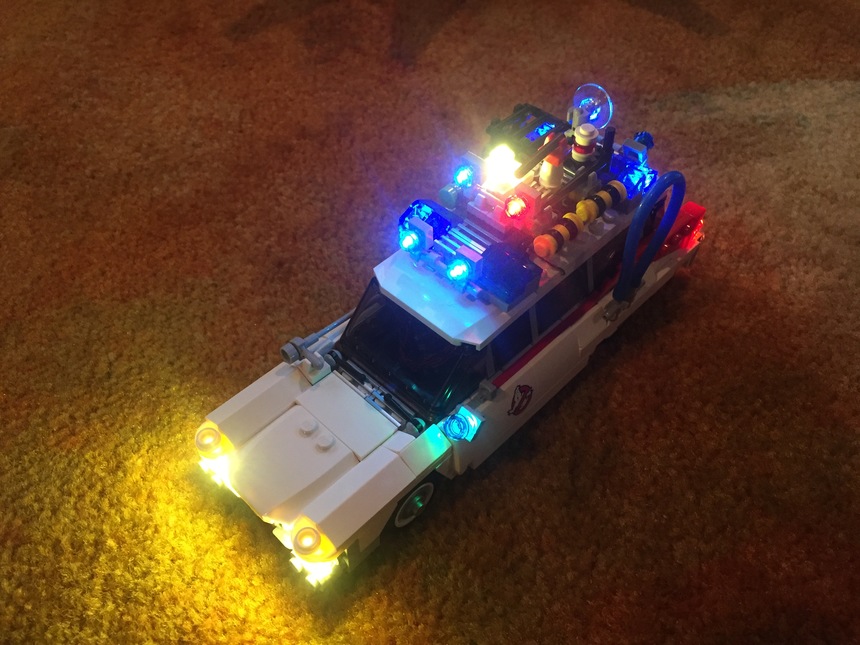
At this point, you are ready to light up your Ecto-1! I have to say, my son and I really liked the way this one came out too. Even though it is one of the smaller one's we've worked it, it was really cool to see it all lit up and flashing like this.


As always, I can't thank Rob enough for being there to help us bring lights to our Lego universe!
2 replies
-
That looks awesome. If I can ask, what all products did you use for this? (I'm brand new to trying to light up my LEGO sets)
Thanks!
-
Jason,
I'm so glad you asked.... as Rob will tell you, lighting is always a very subjective thing. I can tell you from my personal experience over the last couple of years that I've grown much more comfortable in doing this with my son and we can pretty much tackle just about anything we want to now!
I try to post up as many pictures as I can when we're doing our projects to help anyone else who wants to give as much help as I can to anyone who would want to try and work on things like this as well. And, I try to make parts lists before we get started because I try and purchase everything that we need ahead of time. However, having done this for awhile now, I can tell you.... buy extra stuff ahead of time! Especially connecting wires, standard white lights and 1x4 expansion boards.... when you're tackling larger projects those things almost always come in handy!
So, for this project, I think these are the parts that I'd used. Life I'd said in the instructions, the roof is really subjective... these are just the ones that I used for ours:
- headlights: four standard white picos
- light for rear-view mirror: one standard white pico (also one 1x1 transparent blue round brick)
- rear lights: two standard white picos
- top center light on roof: standard white pico
- front emergency lights (roof front): 6 flashing white pico lights
- rear emergency lights (roof rear): 4 flashing white pico lights
- connectors: 4 1x4 expansion boards (enough cables to connect those as well
- power: coin-cell battery
I hope yours comes out really well. When you're done, take pictures and share them with us here. I know everyone here would love to see your work!